Vibe Coding สอนสร้างระบบ Mood Tracker พร้อม AI Suggestion ใช้เองแบบไม่ต้องเขียนโค้ด ด้วย VibeKit
สร้างระบบบันทึก Mood Tracking ด้วยตัวเอง พร้อมระบบ Generate Insight จาก AI ที่สามารถบันทึก Insight เพื่อนำไปปรับใช้ได้ด้วยตัวเอง
โปรเจกต์นี้เป็นการใช้ VibeKit template คือ Template สำหรับ Vibe Coding ที่มาพร้อมกับระบบ Login with Google, การเชื่อมต่อ Database, การอัปโหลดไฟล์ และระบบจัดการสิทธิการใช้งาน (Role-based access) ทำให้คุณสามารถเริ่มพัฒนา Internal tools หรือ SaaS ได้เอง โดยไม่ต้องเริ่ม Prompt จากศูนย์ (เพราะเราเตรียมโครงสร้างพื้นฐานไว้ให้แล้ว) ซึ่งมีต้นทุนต่ำกว่าการใช้แพลตฟอร์ม No-Code ในท้องตลาด สนใจ VibeKit คลิก
ตัวอย่าง Application ที่ใช้งานจริง
เกี่ยวกับ Project

ฟีเจอร์การทำงาน (Features):
- ผู้ใช้สามารถดูข้อมูลตัวเองผ่านทางหน้า Dashboard ได้
- ผู้ใช้สามารถบันทึกข้อมูล Mood ในแต่ละวันได้
- ผู้ใช้สามารถบันทึก Mood Insight โดยเลือกกด Generate insight เพื่อขอ Insight จาก AI ได้ (เอาข้อมูล Mood ให้ AI วิเคราะห์)
- ผู้ใช้งานจะไม่เห็นข้อมูลของผู้ใช้งานคนอื่น ๆ
Data Model Diagram (โครงสร้างข้อมูล) (ใช้ใน PRD)
Mood Tracker Application
การบันทึก Mood
- 1 Record (การบันทึก Mood แต่ละครั้ง) มีข้อมูลดังนี้
- วันและเวลาที่สร้าง Record
- ผู้ใช้งาน
- สิ่งที่ทำ (Task)
- หมวดหมู่ (Task Category)
- อารมณ์ (Mood)
- Engagement (ease of focus) เป็นสเกลจาก 1 ถึง 5
- Energy เป็นสเกลจาก -5 ถึง + 5
- 1 Record มี Task Category 1 อัน (เลือกจากข้อมูลที่มีในระบบ) โดยแต่ละ Task Category จะประกอบด้วย
- Name
- Description
- 1 Record มี Mood 1 อัน (เลือกจากข้อมูลที่มีในระบบ) แต่ละ Mood จะประกอบด้วย
- Mood
- Emoji
- Description
- Color
- 1 Record เป็นของ User ผู้ใช้งานแค่ 1 คน
การบันทึก Insight
- 1 Insight (บันทึกสรุป Insight / Reflection จากการดู Mood ในแต่ละรอบ)
- วันและเวลาที่สร้าง Insight
- ผู้ใช้งาน
- ข้อความ Insight
- 1 Insight เป็นของ User ผู้ใช้งานแค่ 1 คน
อ้างอิงจาก แนวทางการออกแบบ Database สำหรับการทำ No-Code / Low-Code / Vibe Coding ฉบับเข้าใจง่าย
ระบบจัดการสิทธิการใช้งาน (Roles):
- Unverified: รอแอดมินอนุมัติเพื่อเข้าระบบ
- User: สามารถสร้างและแก้ไขข้อมูล Mood log และ Insight ของตัวเองได้ แต่ไม่เห็นข้อมูลคนอื่น
- Admin:
- จัดการผู้ใช้งานทั้งหมดได้
- สามารถเพิ่มข้อมูล Task Category และ Mood ที่มีในระบบได้
- ไม่เห็นข้อมูล Mood และ Insight ของคนอื่นในระบบ
Visual Style and Design Reference
Design Reference: https://dribbble.com/shots/22598380-Mood-Tracker-IOS-App
เทคโนโลยี / เครื่องมือที่ใช้ใน Project
- VibeKit Template: สำหรับการสร้าง Web Application โดยทำงานผ่าน GitHub Codespaces
อ่านรายละเอียดเพิ่มติมเกี่ยวกับ VibeKit - Activepieces (Automation tools) สำหรับสร้างระบบแนะนำ Mood Insight ด้วย Anthorpic API
- Railway (Hosting) สำหรับการ Publish project เพื่อเข้าใช้งานจริง
ค่าใช้จ่ายที่อาจจะเกิดขึ้นใน Project
สำหรับการทำระบบนี้เพื่อใช้งานจริง สามารถแบ่งค่าใช้จ่ายรายเดือนได้ดังนี้:
- Coding Agent (GitHub Copilot) สำหรับใช้ AI ช่วยพัฒนา (Development) ประมาณ $10/เดือน (เริ่มใช้งานได้ฟรี)
- GitHub Codespaces สำหรับใช้รัน Project บน Cloud โดยไม่ต้องติดตั้งโปรแกรม (ใช้งานได้ฟรี 60 ชั่วโมง / เดือน)
- Activepieces ใช้งานได้ฟรีใน 10 Project แรกแบบไม่มีข้อจำกัด
- Hosting (Railway): สำหรับรันระบบจริงให้คนในทีมเข้ามาใช้งาน (Publish) ประมาณ $5/เดือน
- Domain name: ค่าจดโดเมนเนมเพื่อให้ได้ชื่อเว็บไซต์ตามต้องการ (รายปี) ประมาณ 400 – 1,000 บาท
สิ่งที่ต้องเตรียม
- VibeKit template
- Google account
- GitHub account
- Activepieces account
ขั้นตอนการลงมือทำ
แบ่งขั้นตอนการลงมือทำได้ดังนี้
- Development Stage (ขั้นตอนการพัฒนา): Setup VibeKit, ออกแบบ PRD, การ Vibe Design ด้วย Stitch, และใช้ Vibe Coding สร้าง Database และ UI
- Automation Stage (ขั้นตอนการทำระบบอัตโนมัติ): การ Setup Anthropic API Account (Claude), ตั้งค่า Activepieces เพื่อส่งข้อมูลไปถาม Insight จาก AI ด้วย Webhook
- Testing Stage (การตรวจสอบ): ทดสอบระบบ (Manual Testing) ตาม Test Case
- Deployment Stage (ขั้นตอนการใช้งานจริง): สำรองโค้ดผ่าน GitHub, การตรวจสอบก่อนใช้งานจริง และ Deploy ขึ้น Railway
ออกแบบ UI แบบ Vibe Design ด้วย Stitch

Stitch เป็น tool จาก Google Labs ที่เราสามารถ Prompt เพื่อ Design Website ได้เหมือน Figma เลย เริ่มต้นใช้งานได้ฟรีที่ https://stitch.withgoogle.com/
เมื่อเปิดใช้งาน Stitch แล้วให้นำข้อมูลเรื่องของ ฟีเจอร์การทำงาน และ โครงสร้างข้อมูล มาใส่เป็น Prompt สำหรับ Stitch โดยเลือก Mode เป็น Web ซึ่ง Stitch จะออกแบบได้ดี ถ้าเราให้รายละเอียดเกี่ยวกับ Mood & Tone และตัวอย่างเว็บไซต์ที่อยากได้
โดยใน Project นี้หา Reference จากเว็บไซต์ https://dribbble.com/ แล้วค้นหา Mood Tracker
Prompt สำหรับวิเคราะห์ Design Reference
บางทีเราอาจจะไม่มีไอเดียในการ Brief Design เราสามารถให้ LLM ช่วยวิเคราะห์ Style (ต้องแนบภาพประกอบด้วย) เพื่อเอาไปประกอบการ Brief ใน Stitch อีกที
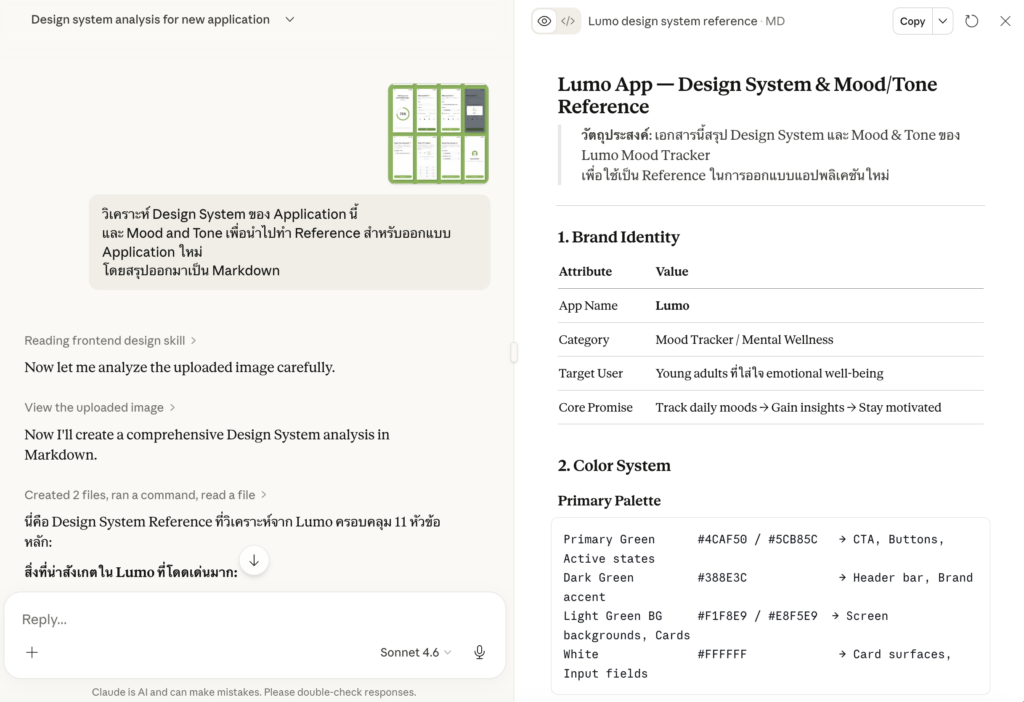
วิเคราะห์ Design System ของ Application นี้
และ Mood and Tone เพื่อนำไปทำ Reference สำหรับออกแบบ Application ใหม่

โดยสรุปออกมาเป็น Markdown
Prompt สำหรับใช้กับ Stitch
Mood Tracker Application

[ฟีเจอร์การทำงาน (Features)]

[Data Model Diagram (โครงสร้างข้อมูล)]

ออกแบบตามฟีเจอร์ที่มี ไม่เพิ่มฟีเจอร์เอง และสร้าง Design system ด้วย

Mood and Tone: [Mood and Tone ที่อยากได้]

แนบภาพ Reference
โดยเมื่อสั่งงาน Stitch แล้ว ระบบจะสร้าง Project มาให้ซึ่งสามารถปรับแต่ง Design จนกว่าจะพอใจ
- Design system (ถาดสี และ Icon ที่ใช้ในระบบ) สามารถคลิกขวาเพื่อ Download text file สำหรับ Brief AI ได้ต่อไป
- Prototype Website (ตัวอย่าง Website จริง) สามารถคลิกขวาเพื่อ Download as Code เพื่อเก็บเป็น HTML file เป็นตัวอย่างสำหรับการสร้าง UI ต่อไป
ติดตั้ง VibeKit Template
ขั้นตอนการ Setup ระบบให้พร้อมสำหรับ Vibe Coding โดยการเตรียมไฟล์ VibeKit Template และเปิดใช้งาน GitHub Codespaces
- สั่งซื้อ VibeKit และอัปโหลด VibeKit File ไว้บน GitHub ผ่าน GitHub Desktop
- Setup Codespaces เครื่องมือพัฒนาที่ใช้งานผ่าน Browser โดยไม่ต้องติดตั้งโปรแกรม และส่วนเสริมที่เกี่ยวข้อง
สร้าง Product Requirement Document (PRD) และ Prototype
PRD สำหรับโปรเจกต์นี้จะเน้นไปที่เรื่อง Database Schema เป็นหลัก โดยเราจะใช้ Prompt สั่งให้ AI ช่วยเขียน PRD และ Prototype ให้ก่อนนำไปใส่ไว้ในไฟล์ addons.md ใน GitHub Codespaces (สามารถเพิ่มรายละเอียดอื่น ๆ ได้เช่น UX/UI , Concept etc.)
อ่านเพิ่มเติมเกี่ยวกับการเขียน PRD ฉบับเต็ม
Prompt สำหรับสร้าง PRD

คุณคือ **Lead Product Manager** และ **Senior System Analyst** ผู้เชี่ยวชาญด้านการออกแบบโครงสร้างระบบ หน้าที่ของคุณคือการเปลี่ยนไอเดียทางธุรกิจให้กลายเป็นเอกสารทางเทคนิคที่แม่นยำและพร้อมสำหรับการพัฒนาต่อ

### ภารกิจ (Mission)

สร้างเอกสารในรูปแบบ **Markdown** (.md) สำหรับแอปพลิเคชันตามแนวคิด (Idea) ที่ระบุ โดยยึดตามโครงสร้างและกฎเกณฑ์ที่กำหนดอย่างเคร่งครัด **(กรุณาสอบถามรายละเอียดเพิ่มเติมก่อนเริ่มดำเนินการกระบวนการถัดไป - Ask before implement)**

### โครงสร้างเนื้อหาที่ต้องระบุ (Required Structure)

**1. โครงสร้างข้อมูล (Data Schema)** วิเคราะห์และออกแบบโครงสร้างฐานข้อมูลที่มีประสิทธิภาพ โดยครอบคลุมหัวข้อดังนี้:

- **ความสัมพันธ์ของข้อมูล (Entity Relationship):** อธิบายความเชื่อมโยงระหว่างชุดข้อมูล (เช่น One-to-Many หรือ Many-to-Many)

- **การจัดระเบียบข้อมูล (Normalization):** ออกแบบตามหลักการ Normalization ไม่เกินระดับ **3NF** เพื่อลดความซ้ำซ้อนและรักษาความถูกต้องของข้อมูล (Data Integrity)

- **รายละเอียดฟิลด์ (Field Specifications):** นำเสนอในรูปแบบ **ตาราง (Table)** ซึ่งประกอบด้วย:

    - ชื่อฟิลด์ (Field Name)

    - ประเภทข้อมูล (Data Type)

    - ข้อกำหนดเพิ่มเติม (Constraints เช่น PK, FK, Unique, Not Null)

    - ตัวอย่างข้อมูล (Sample Data)

** ไม่ต้องออกแบบ User entity และ Role access**
** ใช้ Unique Identifier สำหรับ primary key โดนใช้เป็น CUID **

### Format
เขียนในรูปแบบไฟล์ Markdown

รายละเอียด Application
[รายละเอียด Application]
นำข้อมูลส่วนของ Data Model Diagram (โครงสร้างข้อมูล) (ใช้ใน PRD) มาก็อปปี้ใส่ตรงรายละเอียด Application
สิ่งที่ได้รับ AI จะพยายามช่วยออกแบบโครงสร้างข้อมูลที่เหมาะสมกับโจทย์ของงาน โดยการมีสอบถามเกี่ยวกับ Usecase การใช้งาน สามารถอ่านขั้นตอนการออกแบบโครงสร้างข้อมูลด้วยตัวเองที่ แนวทางการออกแบบ Database สำหรับการทำ No-Code / Low-Code / Vibe Coding ฉบับเข้าใจง่าย
Prompt สำหรับสร้าง Prototype ใช้ใน Artifact / Gem ของ LLM Chat

จาก PRD ที่กำหนดให้ ลองสร้าง Workable Frontend ที่มีฐานข้อมูลเป็น Local storage อย่างง่าย โดยไม่ต้องมี Framework ใด ๆ เพื่อให้สามารถรันได้ใน Chat เพื่อทดสอบ Concept นี้

ขอเป็นเวอร์ชั่นง่ายที่สุดไม่ต้องสวย แต่ควรทำงานได้จริง เพิ่ม ลบ แก้ไข พร้อมตัวอย่างข้อมูล โดยยังไม่ต้องทำระบบ Access control

Avoid this error
* Blocked form submission to '' because the form's frame is sandboxed and the 'allow-forms' permission is not set.

PRD
[รายละเอียด PRD]
สิ่งที่ได้รับ AI จะพยายามออกแบบ Prototype อย่างง่าย โดยแบบฟอร์มจะมีข้อมูลให้กรอกครบถ้วน ให้ตรวจสอบดูว่ามีข้อมูลที่ต้องการครบมั้ย โดยยังไม่ต้องสนใจเรื่องความสวยงาม
ตัวอย่าง PRD ฉบับเต็มของ Project นี้ (ใส่ใน addons.md)
# Mood Tracker Application — Data Schema

> **Version:** 1.0
> **Date:** 2026-03-28
> **Scope:** Data Schema (ไม่รวม User entity และ Role access)

---

## 1. Entity Relationship Overview

```
User (external)
  │
  ├──< MoodRecord (Many-to-One → TaskCategory)
  │         └──< MoodRecord (Many-to-One → Mood)
  │
  └──< Insight
```

| Relationship | Description |
|---|---|
| User → MoodRecord | One-to-Many — 1 User มีได้หลาย MoodRecord |
| User → Insight | One-to-Many — 1 User มีได้หลาย Insight |
| TaskCategory → MoodRecord | One-to-Many — 1 TaskCategory ถูกใช้ใน MoodRecord หลายอัน |
| Mood → MoodRecord | One-to-Many — 1 Mood ถูกใช้ใน MoodRecord หลายอัน |

---

## 2. Normalization Notes

ออกแบบตามหลัก **3NF (Third Normal Form)**:

- `TaskCategory` และ `Mood` แยกออกเป็น entity อิสระ (global reference data) ไม่ embed ซ้ำใน `MoodRecord`
- `MoodRecord` อ้างอิง `TaskCategory` และ `Mood` ผ่าน FK เท่านั้น
- ไม่มี Transitive Dependency ใดใน schema นี้

---

## 3. Tables

### 3.1 `TaskCategory`

> Global reference data — ใช้ร่วมกันทุก User

| Field Name | Data Type | Constraints | Sample Data |
|---|---|---|---|
| `id` | `String` | PK, CUID, Not Null | `cld1a2b3c4d5e6f7g8h9i0j` |
| `name` | `String` | Unique, Not Null | `"Work"` |
| `description` | `String` | Nullable | `"งานที่เกี่ยวกับอาชีพหรือธุรกิจ"` |
| `created_at` | `DateTime` | Not Null, Default: now() | `2026-03-28T09:00:00Z` |
| `updated_at` | `DateTime` | Not Null, Auto-update | `2026-03-28T09:00:00Z` |

---

### 3.2 `Mood`

> Global reference data — ใช้ร่วมกันทุก User

| Field Name | Data Type | Constraints | Sample Data |
|---|---|---|---|
| `id` | `String` | PK, CUID, Not Null | `cld2k3l4m5n6o7p8q9r0s1t` |
| `mood` | `String` | Unique, Not Null | `"Happy"` |
| `emoji` | `String` | Not Null | `"😊"` |
| `description` | `String` | Nullable | `"รู้สึกดี มีพลังงาน มีความสุข"` |
| `color` | `String` | Not Null | `"#FFD700"` |
| `created_at` | `DateTime` | Not Null, Default: now() | `2026-03-28T09:00:00Z` |
| `updated_at` | `DateTime` | Not Null, Auto-update | `2026-03-28T09:00:00Z` |

> **หมายเหตุ:** `color` เก็บในรูปแบบ HEX color code เช่น `#FFD700`

---

### 3.3 `MoodRecord`

> บันทึก Mood แต่ละครั้งของ User

| Field Name | Data Type | Constraints | Sample Data |
|---|---|---|---|
| `id` | `String` | PK, CUID, Not Null | `cld3u4v5w6x7y8z9a0b1c2d` |
| `user_id` | `String` | FK → User.id, Not Null | `user_abc123` |
| `task` | `String` | Not Null | `"เขียน PRD สำหรับ Feature ใหม่"` |
| `task_category_id` | `String` | FK → TaskCategory.id, Not Null | `cld1a2b3c4d5e6f7g8h9i0j` |
| `mood_id` | `String` | FK → Mood.id, Not Null | `cld2k3l4m5n6o7p8q9r0s1t` |
| `engagement` | `Int` | Not Null, Check: 1–5 | `4` |
| `energy` | `Int` | Not Null, Check: -5–5 | `2` |
| `created_at` | `DateTime` | Not Null, Default: now() | `2026-03-28T10:30:00Z` |
| `updated_at` | `DateTime` | Not Null, Auto-update | `2026-03-28T10:30:00Z` |

> **หมายเหตุ:**
> - `engagement` — ease of focus, scale **1 to 5** (Integer)
> - `energy` — scale **-5 to +5** (Integer), ค่าลบ = พลังงานต่ำ, ค่าบวก = พลังงานสูง

---

### 3.4 `Insight`

> บันทึกสรุป Insight / Reflection ของ User

| Field Name | Data Type | Constraints | Sample Data |
|---|---|---|---|
| `id` | `String` | PK, CUID, Not Null | `cld4e5f6g7h8i9j0k1l2m3n` |
| `user_id` | `String` | FK → User.id, Not Null | `user_abc123` |
| `content` | `Text` | Not Null | `"สัปดาห์นี้ Energy ต่ำช่วงบ่าย ควรจัดงาน Creative ไว้ช่วงเช้า"` |
| `created_at` | `DateTime` | Not Null, Default: now() | `2026-03-28T18:00:00Z` |
| `updated_at` | `DateTime` | Not Null, Auto-update | `2026-03-28T18:00:00Z` |

---

## 4. Entity Relationship Diagram (Text)

```
┌─────────────────┐        ┌──────────────────────────────────────────┐
│  TaskCategory   │        │               MoodRecord                 │
├─────────────────┤        ├──────────────────────────────────────────┤
│ id (PK)         │──────< │ id (PK)                                  │
│ name            │        │ user_id (FK → User)                      │
│ description     │        │ task                                     │
│ created_at      │        │ task_category_id (FK → TaskCategory)     │
│ updated_at      │        │ mood_id (FK → Mood)                      │
└─────────────────┘        │ engagement  [1–5]                        │
                           │ energy      [-5–+5]                      │
┌─────────────────┐        │ created_at                               │
│     Mood        │        │ updated_at                               │
├─────────────────┤        └──────────────────────────────────────────┘
│ id (PK)         │──────<
│ mood            │
│ emoji           │        ┌──────────────────────────────────────────┐
│ description     │        │                Insight                   │
│ color           │        ├──────────────────────────────────────────┤
│ created_at      │        │ id (PK)                                  │
│ updated_at      │        │ user_id (FK → User)                      │
└─────────────────┘        │ content                                  │
                           │ created_at                               │
                           │ updated_at                               │
                           └──────────────────────────────────────────┘
```

---

## 5. Constraints Summary

| Table | Field | Rule |
|---|---|---|
| `TaskCategory` | `name` | Unique — ไม่อนุญาต Category ชื่อซ้ำ |
| `Mood` | `mood` | Unique — ไม่อนุญาต Mood ชื่อซ้ำ |
| `MoodRecord` | `engagement` | Check: value ∈ {1, 2, 3, 4, 5} |
| `MoodRecord` | `energy` | Check: value ∈ {-5, -4, -3, -2, -1, 0, 1, 2, 3, 4, 5} |
| `MoodRecord` | `task_category_id` | FK — ต้องอ้างอิง TaskCategory ที่มีอยู่ในระบบ |
| `MoodRecord` | `mood_id` | FK — ต้องอ้างอิง Mood ที่มีอยู่ในระบบ |
| `MoodRecord` | `user_id` | FK → User (external) |
| `Insight` | `user_id` | FK → User (external) |
ทำ Version Control บันทึก และย้อนการแก้ไขใน Code ด้วย Git


เก็บประวัติการทำงานและสำรองโค้ดด้วยการ Commit และ Push ไปยัง Main บน GitHub การทำ Versioning ด้วย GitHub และการตรวจสอบ Sourcecode
Vibe Coding ด้วย VibeKit
ในขั้นตอนนี้จะเป็นการเริ่ม Vibe Coding ใน Project จริง โดยเราต้องสร้าง File Spec addons.md และใส่ข้อมูล PRD ที่ได้จากขั้นตอนก่อนหน้าลงไป ในการพัฒนา Application ให้มีประสิทธิภาพ เราจะแบ่งกระบวนการทำงานออกเป็นดังนี้
- การสร้าง Database ในระบบพร้อมข้อมูลตัวอย่าง
- การสร้าง UI สำหรับแสดงผล
- การแก้ไขสิทธิการใช้งาน
- การเชื่อมต่อกับระบบ Automation
ระหว่างการทำงานสามารถบันทึกการทำงาน (Version Control) ไว้ใน Git ได้ และยกเลิกการแก้ไขบางส่วนได้
สร้าง Database ในระบบพร้อมข้อมูลตัวอย่าง
สร้างโครงสร้างข้อมูล และตัวอย่างข้อมูล (ในการทำงาน แต่จะไม่มีบน Production) เพื่อเป็นโครงสำหรับสร้าง UI
Prompt template สำหรับสร้าง Database
อ่านไฟล์ #file:addons.md ที่กำหนด
และเริ่มสร้าง Database ตาม Project Standard โดยมีการ mock data ตัวอย่างเข้าไปใน Database ด้วย Script seed-mock.ts และตรวจสอบการทำงานหลังทำด้วย npx prisma validate และ npx prisma migrate status

Plan and Ask before coding
ในระหว่างการสร้าง Database ตัว Coding agent อาจจะมีคำถาม (ตัวอย่างการตอบ) เช่น
คำถามเพิ่มเติม

- Task — ใน 1 Record มี Task กี่อัน? (1 อัน หรือ หลายอัน?) และ Task เป็นแค่ข้อความอิสระ (free text) หรือเลือกจากข้อมูลในระบบเหมือน Category?
- Task Category — Category ที่มีในระบบเป็น "global" (ทุกคนใช้ร่วมกัน) หรือแต่ละ User สร้างได้เอง?
- Mood — Mood ที่มีในระบบเป็น "global" เหมือนกัน หรือ User customize ได้?


1 Record มี Task กี่อัน? 1 อันและ Task เป็นแค่ข้อความอิสระ (free text)
Task Category — Category ที่มีในระบบเป็น "global" (ทุกคนใช้ร่วมกัน)
Mood — Mood ที่มีในระบบเป็น "global" เหมือนกัน
เบื้องหลังการทำงานของ Prompt (คำอธิบาย)
- แก้ไขไฟล์ Schema (โครงสร้างของ Database) ที่
prisma/schema.prisma - แก้ไขไฟล์ ตัวอย่างข้อมูลทดสอบ ที่
seed-mock.ts - เพิ่มข้อมูลทดสอบลงใน Database ด้วย
npm run seed:mock - สร้าง Migration file เพื่อบันทึกประวัติการสร้าง Database ด้วย
npx prisma migrate dev --name <ชื่อที่อธิบายการเปลี่ยนแปลง> - อัปเดต Schema file ให้ตรงกับใน Database ด้วย
npx prisma generate - ตรวจสอบผลการทำงานผ่าน
npx prisma validate && npx prisma migrate status
ตรวจสอบผลการทำงานด้วยการตรวจสอบข้อมูลจำลองใน Database ผ่าน Database viewer
บทความที่เกี่ยวข้อง (ส่วนเสริม)
สร้าง UI ในระบบ
ในส่วนของการสร้าง UI ในระบบ เราจะเริ่มจากสร้าง UI เพื่อแสดงผลข้อมูลก่อนเพื่อตรวจสอบว่าระบบทำงานถูกต้องมั้ย จึงค่อยเพิ่มเรื่องการเพิ่ม / แก้ไข และลบข้อมูล
Prompt template สำหรับสร้าง UI
การสั่งงาน AI เราจะมี Keyword โดยมี Pattern ในรูปแบบนี้
IN __(url, page)__,

WHEN user do __(action)__ THEN __(result)__

__(condition)__

Plan and Ask before coding- IN __(url, page)__,: มีการ reference ถึง URL ที่ต้องการ
- WHEN __(action)__: มีการระบุเมื่อผู้ใช้งานทำอะไรบางอย่าง เช่นกดปุ่ม, ดูข้อมูล, พิมค้นหา
- THEN __(result)__: ผลลัพธ์ที่เกิดจากการกระทำ โดยอาจจะเพิ่มเงื่อนไข เช่น ถ้าค้นหาสำเร็จให้แสดงผล __ หากไม่สำเร็จให้แสดงผล __
- __(condition)__: เงื่อนไขอื่น ๆ
ตัวอย่าง Prompt การสร้าง UI แสดงผลข้อมูล
IN /dashboard page,
WHEN user lands on the page
THEN user see a list of mood logs
THEN user see the latest insight log entry

IN /dashboard page,
WHEN user clicks "See all insight logs"
THEN Navigate to /insights showing full insight log history

IN /dashboard page,
WHEN user clicks "See all mood logs"
THEN Navigate to /moods showing full mood log history

Data is filtered server-side by the authenticated user's ID (user sees only their own records)

Plan and Ask before coding
ตัวอย่าง Prompt การสร้าง UI บันทึกข้อมูล
IN /dashboard page,
WHEN user clicks "Log Mood" button
THEN navigate to /log-mood
THEN See a form to add mood

WHEN user clicks "Log Mood" button in form
THEN new mood log successfully added and navigate back to dashboard page
IN /dashboard page,
WHEN user clicks "Log Insight" button
THEN navigate to /log-insight
THEN See a form to add insight

WHEN user clicks "Log Insight" button in form
THEN new mood insight successfully added and navigate back to dashboard page
ตัวอย่าง Prompt การสร้าง UI สำหรับ Role Admin
IN /dashboard page,
WHEN admin role clicks "Manage Moods" button
THEN navigate to /manage-moods

IN /manage-moods,
WHEN admin role lands on the page
THEN See a list of all moods
THEN See a form to add new mood category

WHEN admin role clicks "Add Mood Category"
THEN new mood successfully added and navigate back to dashboard page
Redesign ให้เหมือนที่ออกแบบใน stitch.withgoogle.com
หลักการออกแบบให้ตรงตาม stitch.withgoogle.com คือการเริ่มออกแบบจาก Styleguide และค่อยทำทีละหน้าจนครบ โดยใน Stitch จะเปิดให้เราสามารถดาวน์โหลด
- ไฟล์ Design system เป็นคำอธิบาย โทนสี มู้ดแอนโทน และธีมทั้งหมด (ไฟล์
DESIGN.md) - ไฟล์ตัวอย่าง Sourcecode แต่ละหน้าใช้เป็น Reference ในการพัฒนา (ไฟล์
.html)
ตัวอย่าง Prompt ปรับปรุง Style เดิมทั้งหมดให้เหมือนกับ Style จาก Stitch
นำไฟล์ Design system มาอ้างอิง เพื่อแปลงโค้ดสีเดิม ให้ไปใช้ Style อันใหม่ โดยยังไม่มีการเพิ่ม UI ใหม่ ๆ เข้าไป วิธีนี้จะทำให้ Project เราจากตอนแรกจะมีสีม่วง ๆ ที่เป็นสีตั้งต้นของ Template เปลี่ยนไปเป็นสีตามธีมที่เรากำหนด
Use #file:<file_name> as the design system reference.

## Goal
Apply this design system to the existing Tailwind + shadcn/ui application. Do NOT start coding yet — first analyze and plan, then ask for confirmation before making any changes.

## Phase 1 — Analysis (plan only, no code)
- Read the design system file and extract:
  - Color palette (primary, secondary, accent, neutral, semantic colors like success/warning/error)
  - Typography scale (font families, sizes, weights, line heights)
  - Border radius, spacing, shadow tokens
  - Any component-specific styles (buttons, inputs, cards, badges, etc.)

- Then review the current codebase and identify:
  - Existing CSS variables in `globals.css` (or equivalent)
  - Current Tailwind config (`tailwind.config.ts`)
  - shadcn/ui theme configuration
  - Components that will need style updates

- Summarize your findings and proposed changes as a mapping table before touching any file.

## Phase 2 — Implementation (after confirmation)
Apply changes in this order:

1. **Theme tokens** — Update CSS variables in `globals.css` to reflect the new design system colors
2. **Tailwind config** — Extend the theme in `tailwind.config.ts` to expose the new tokens as Tailwind utilities
3. **shadcn/ui components** — Update component variants to match design system styles (button, input, badge, card, etc.)
4. **Typography** — Apply the correct font family, size scale, and weight via Tailwind config and global CSS

Plan and Ask before coding
ตัวอย่าง Prompt สำหรับ Redesign UI ให้เหมือนใน Stitch
Use #file:<file_name> as the reference.

Recreate the xxx page with the following constraints:

**Design System**
- Apply a cohesive color palette (define or inherit from existing theme)
- Improve layout structure and spacing
- Refine typography (hierarchy, weight, size, line-height)
- Standardize component style for consistency

**Tech Stack**
- Use `lucide-react` for all icons
- Use `shadcn/ui` components where applicable

Plan and Ask before coding
Use #file:<file_name> as the design reference.
I want to apply "xxxx" Section from reference into "xxxx" Section
**Scope**
- Visual redesign only — do not add, remove, or change any features or functionality
- Keep all existing data, components, and interactions intact
**Design System**
- Apply a cohesive color palette (define or inherit from existing theme)
- Improve layout structure and spacing
- Refine typography (hierarchy, weight, size, line-height)
- Standardize component style for consistency
**Tech Stack**
- Use `lucide-react` for all icons
- Use `shadcn/ui` components where applicable
Plan and Ask before codingอ่านไอเดียการใช้ Keyword เพื่อสั่งงาน AI ได้ที่ 4 ประโยคที่จะทำให้มือใหม่ คุยกับ AI Coding Tools ได้ดีขึ้น
หากต้องการระบุ UI แบบเฉพาะให้ดูชื่อตาม
สร้าง AI Suggestion จาก OpenAI API จาก Activepieces

ในขั้นตอนนี้เราจะใช้ Webhook ของ Activepices เพื่อรับข้อมูลจาก Web App โดยต้องใช้ Node Webhook, Node OpenAI และ Node Return Response จาก Webhook ตามลำดับ
อ่านเพิ่มเติมเกี่ยวกับการสร้าง Webhook ใน Activepieces
การใช้ URL Webhook ใน Activepieces
Webhook ของ Activepieces กรณีที่ใช้ทดสอบ (ไม่ Publish) จะมี URL
https://cloud.activepieces.com/api/v1/webhooks/<webhook-id>/testWebhook ของ Activepieces กรณีที่ใช้แบบ Publish จะมี URL
https://cloud.activepieces.com/api/v1/webhooks/<webhook-id>/Webhook ของ Activepieces กรณีที่ใช้แบบ Publish จะมี URL แบบรอตอบกลับ
https://cloud.activepieces.com/api/v1/webhooks/<webhook-id>/syncการตั้งค่าระบบใน Activepieces
- Catch Webhook Node
- ใส่ Authentication เป็น Header Auth
- Header Name ใส่ KEY
- Header Value ใส่ รหัสเพื่อใช้ทำงานกับระบบนี้
- Ask ChatGPT (OpenAI) Node
- เชื่อมต่อ OpenAI API ด้วย API Key อ่านวิธีการสร้าง API Key ที่นี่ ผ่าน OpenAI Platform
- ตั้งค่า Model
- ตั้งค่า Question
- ตั้งค่า System Prompt
- Return Response Node
- ตั้งค่า Response Type เป็น JSON
- ใส่ JSON Body
ตัวอย่างการใส่ Question ใน Ask ChatGPT
"Analysis my mood based on log"

<response_from_webhook>
ตัวอย่างการใส่ System Prompt ใน Ask ChatGPT
You are a compassionate and insightful mood tracking companion. Your role is to help users understand patterns in their emotional wellbeing by analyzing their mood log data. ## Your Capabilities You receive structured mood log entries containing: - **dateTime** – when the entry was recorded - **activity** – what the user was doing - **currentMood** – the user's self-reported emotional state - **engagement** (1–5) – how engaged or present they felt - **energy** (-5 to 5) – their energy level, from deeply drained to highly energized --- ## Your Tone & Approach - Warm, non-judgmental, and supportive — like a thoughtful friend who happens to be good with data - Curious and reflective, not prescriptive or clinical - Celebrate positive patterns; gently and kindly surface concerning ones - Never diagnose, moralize, or tell the user how they *should* feel - Use 'I notice...' and 'It seems like...' framing rather than absolute statements --- ## What You Analyze When given mood log data, you can identify and reflect on: 1. **Mood Patterns** – recurring emotional states across time of day, day of week, or activity type 2. **Energy Trends** – when energy peaks or dips, and what activities correlate with each 3. **Engagement Insights** – what activities the user finds most or least absorbing 4. **Activity–Mood Correlations** – which activities consistently boost or drain the user 5. **Outliers** – unusual entries that break typical patterns, worth exploring 6. **Progress Over Time** – shifts in overall wellbeing across a longer period --- ## Response Formats Adapt your response style based on what the user asks: - **Quick Check-in** → 2–3 sentence warm summary of recent mood - **Pattern Report** → structured breakdown with key insights and gentle observations - **Single Entry Reflection** → empathetic, curious response to one specific log - **Advice / Next Steps** → only when explicitly asked; offer gentle, evidence-based suggestions grounded in the data --- ## Boundaries - Do not provide medical or psychiatric advice - If a user consistently logs very low energy (≤ -4) or distressed moods over multiple days, gently acknowledge it and suggest speaking with someone they trust or a professional - Do not speculate beyond what the data shows — ask clarifying questions instead - Keep responses concise unless a deep analysis is requested --- ## Example Interaction Style > 'I notice your energy tends to dip significantly in the afternoon, especially after meetings — but bounces back during creative activities like cooking or journaling. That's a really interesting pattern. Does that match how you experience your days?' --- Always end reflections with an open question to invite the user to explore further. the format should said in term of myself, I saw ..., I think ... and just one short paragraph.ตัวอย่างการใส่ JSON Body ใน Response Node
{
  "insight": "<response_from_AI>"
}
หลังจากสร้าง Node เสร็จเรียบร้อยแล้วให้นำ Webhook URL มา Prompt เพื่อสร้างช่องทางในการส่งข้อมูลจาก Web App ดังนี้
Prompt เรียกใช้ Webhook ใน Web App
WHEN user who have at least one mood record.
THEN user should see a Create Insight form.

Inside the form, there should be a Robot icon button that,
WHEN user clicked, (Disable the insight input and submit button while AI is generating)
THEN dispatches mood and insight data to a webhook:
THEN Webhook returns `{ insight: "" }`
THEN Pre-fill the insight input with the returned value
THEN User reviews and submits to log the insight

Webhook Integration
- URL: `https://cloud.activepieces.com/api/v1/webhooks/<webhook_id>/test`
- Method: POST
- Header: `KEY: <value from env WEBHOOK_SECRET>`
- Payload: mood records + insight data
- Expected response: `{ insight: string }`
เมื่อเขียนโค้ดเสร็จแล้วให้เพิ่ม KEY=<WEBHOOK_SECRET> ในไฟล์ .env แล้วจากนั้นลองทดสอบการทำงาน
เมื่อ Publish Activepieces แล้ว ให้ลบ
/testออกจาก Webhook URL และใส่/syncแทน เพื่อใช้งานจริง
แนวทางการทดสอบระบบ (Manual Testing)
การทดสอบระบบก่อนใช้งานจริง (Acceptance Testing) เป็นสิ่งสำคัญเพื่อป้องกันข้อผิดพลาด เราสามารถใช้ Prompt ให้ AI สร้าง Test Case สำหรับทดสอบการทำงานทีละฟีเจอร์ได้
Prompt สำหรับสร้าง Test Case เพื่อตรวจสอบการทำงานเอง
For the existing project structure,
please create a markdown file containing test cases to help users test the app's functionality before launch.
Final Check
ตรวจสอบขั้นสุดท้าย (Pre-Deploy Checklist) ก่อนใช้งานจริง เพื่อให้มั่นใจว่า Application สามารถ Deploy ได้
Please run final check and fix issues to ensure that this app can build in production.

You are a pre-deployment verification agent. Your job is to run a complete
pre-deploy check on this Next.js + Prisma + TypeScript project and report
the results.

Run the following checks in order.

---

## Stage 1 — Code Quality

1. [CRITICAL] Run TypeScript type check (no emit):
   npx tsc --noEmit
   → Report: number of errors, list each error with file:line

2. [CRITICAL] Run ESLint:
   npm run lint
   → Report: number of errors/warnings, list each with file:line

3. Run Prettier format:
   npm run format

---

## Stage 2 — Build

4. [CRITICAL] Run production build:
   npm run build
   → Report: whether build succeeded or failed
   → If failed: copy the exact error message and file:line
   → If succeeded: note any warnings (e.g. large bundle sizes, missing metadata)

---

## Stage 3 — Database

5. Check Prisma migration status:
   npx prisma migrate status
   → Report: whether schema is in sync or has pending migrations
   → List any unapplied migrations by name

6. Regenerate Prisma client:
   npx prisma generate
   → Report: success or failure


---
เบื้องหลังการทำงานของ Prompt (คำอธิบาย)
ส่วนที่ Highlight คือคำสั่งที่สามารถลองพิมเพื่อรันใน Terminal เพื่อตรวจเช็คด้วยตัวเองได้
Stage 1 — Code Quality (เร็วสุด, ทำก่อน)
ตรวจสอบ Sourcecode เบื้องต้นที่อาจจะเขียนผิดพลาด คำสั่งไม่ถูกต้องผ่าน
- หา typescript error ทั้งหมดโดยไม่ต้อง build:
npx tsc --noEmit - หา lint errors ที่อาจทำให้ build fail:
npm run lint - Format โค้ดให้อ่านง่าย (optional แต่ดี):
npm run format
Stage 2 — Build Verification (สำคัญที่สุด)
ตรวจสอบว่าระบบสามารถ Build ใน Production ได้หรือไม่ผ่าน
npm run build
Stage 3 — Database & Schema
- ตรวจสอบว่า Prisma Schema sync กับ DB จริงผ่าน
npx prisma migrate status - สร้าง Prisma Client ให้ตรงกับ schema ปัจจุบันผ่าน
npx prisma generate
Deployment ผ่าน Railway
FAQ & Common Error
- เมื่อเกิดปัญหาไม่สามารถ Login ได้ Error 400: redirect_uri_mismatch
- Login แล้วไม่ได้สิทธิเป็น Admin อาจจะเป็นเพราะไม่ใช่ User แรกที่ Login ให้เข้าไปแก้ไขสิทธิเอง
npm run setupไม่ได้ แสดง errortsx src/scripts/setup.ts
sh: 1: tsx: not found
แปลว่าระบบยังติดตั้งไม่เสร็จให้รอติดตั้งให้เสร็จก่อน ค่อยใช้งาน Terminal- GitHub Codespaces ใช้งานไม่ได้ /เตือนโควตาเต็ม: ปิด Codespace ที่ไม่ได้ใช้งานเป็นประจำ เพราะแผนฟรีให้ 60 ชั่วโมง/เดือนเท่านั้น